Orchid Arboretums in 360 VR

A little fun with my (now-ancient!) Ricoh Theta SC VR camera.

I had part of a morning in Thailand to explore the Tweechol Botanic Garden outside Chiang Mai. I’ve been there several times and love to walk around the many garden sections. I hadn’t been inside these arboretums in the past, and love these kinds of environments.

This is a little walk-through in 360VR. The video quality isn’t great because of the limitations of this older camera. Pondering an upgrade now… šŸ˜‰


My “Best Kit” for Mobile Production

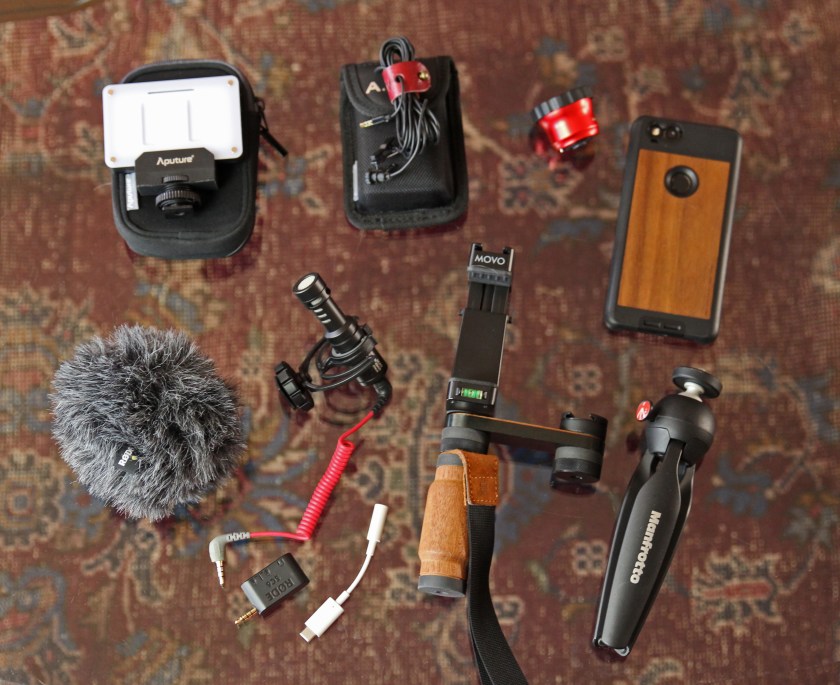
I was prepping last week for a short trip to Asia. As I was sorting gear, I thought I’d write a bit here about what I chose to take, and why. Here’s the layout.

mobile gear layout 2

One of the things I’ll be doing on this trip is introducing co-workers to opportunities to use mobile devices and simple gear to create compelling content for their varied audiences. I decided to bring some examples of gear from what I’ve collected over the years.

I want to over the key technical needs for video, audio, lights, and mounting a mobile as a camera. I also want a kit that will fit in a small camera bag that will then slip into my normal carry-on. I’m thinking one-person-band like many of us in the mojo world.


full rig vert 2

Full Rig: I am thinking of mostly run-and-gun shooting, with lots of handheld shots, easily transported, but also something I can set down for a longer shot, like an interview or event, if needed. Of course, I might often choose to strip this down to a few pieces for even more mobility.

My kit ended up being mix-and-match from different manufacturers, but I’ll explain why I chose what I did and spec some models if you want to check them out for yourself. I’m not sponsored by anyone and this is all stuff I’ve picked up over the last few years. There may be some new options that you can also check out based on this list. Create your own ā€œideal kit.ā€


Basemanfrotto tripod: When I want to set this all down for either a steady shot or just between shots, a nice small tripod is essential. I’m using a Manfrotto Pixi Mini tripod for this one. It’s beautifully designed, very compact and solid. The best part for me is how it feels when I fold the legs and handhold it as a support. It also has quick, one-button leveling. It’s not as infinitely flexible as something like a Gorillapod, but it’s a neater package. If I know I’m going to need to mount my camera on a tree branch or light post, I’d bring my Gorillapod.


shoulderpod handle

Phone Mount: For traditional (horizontal) video production, I really like this mash-up. I’m using a Shoulderpod H1 handle, topped by a Movo PR-1 smartphone grip rig. You can see that I’m also using the Shoulderpod short plate arm when I want to have a mic and light mounted to the rig. I love the Shoulderpod gear. It’s elegant and very high quality. The feel of this handle is great by itself and reminds me of my film shooting days with Aaton cameras and their famous wooden grip. Of course, Shoulderpod also makes a nice grip for a phone as well and it comes as a kit with this handle. But their clamp (at least the original model I have) is missing one important feature – a cold shoe. If I want to go really compact, with just a phone and a small movo grip topshotgun mic, the Movo clamp has a convenient cold shoe to let me just mount the mic (or anything else) up top, and I’m ready to go. With a Shoulderpod and other clamps, I have to add an arm. So, kudos to Movo for adding the shoe, and a handy bubble level. Maybe it’s not as pretty, but I’ll take it. (Movo’s handle, on the other hand, is a short little thing that’s harder to hold. Go figure; mix it up.)


rode videomicroAudio: For on-the-go news and documentary filmmaking, or for capturing b-roll shots, I want a good external microphone. This one is Rode’s Videomicro mini shotgun mic (with their SC7 cable to make compatible with a smartphone.) It’s a big improvement on the phone’s mics and well worth the investment. I can mount it on the phone clamp or on an extension arm, cage, etc. Connecting the mic to a phone like my Google Pixel 2 requires adding a 3.5mm to USB-C dongle. That’s becoming more common. I also add a Rode SC6 adaptor. I audio connections horizlike to monitor audio while I’m filming, especially for interviews. The SC6 lets me connect two mics – like a shotgun and an Aputure A.lav microphone (shown in the gear layout) or two lavalier mics. Plus, I can monitor through its headphone jack.


aputure led light

Lights: I generally shoot with existing light unless I’m making a scripted, narrative film. But having a small LED light can be very helpful as a supplement for news and doc shoots. This Aputure AL-M9 is small, rechargeable, color-accurate, and dimmable. Their color correcting gels are pretty lame, but, oh well. I would bring a larger LED panel if I’m really trying to light something and so more color adjustment.


sirui tele lensCase and Lens: For a compact and really solid kit, I really like the Moment photo case. They make them for some of the higher-end phones. I don’t like to mess with clip-on lenses if I’m trying to travel small. Again, I’m cheating here by using a Moment case with a Sirui lens. (I’m killing my product endorsement opportunities here, I know!) When I got my Moment case for the Pixel 2, I also ordered the Moment 2x tele lens. That first version from Moment was really pitched as an ā€˜art’ lens because it was so soft at the edges. (Their new version looks really sweet and they’ve re-engineered the lens for much better image quality, so it’s worth checking out.)Ā  But, when I needed a tele lens, Sirui had a 60mm (2x) tele lens that looks great and mounts on the Moment case. If you are looking today, I think either lens is a good choice – with Sirui being a more budget-friendly option. I carry the tele lens most of the time and not always a wide angle because the Pixel 2 is pretty wide already. This is still for the world of single-lens phones; the add-on lenses do interesting things with more recent multi-lens cameras, so check them out.

There you have it – my running rig. I build it up and down as I need it. And it fits easily in a small camera bag.

This is what’s in my closet and carry-on for simple but effective shooting. I bet there are things you may like and recommend. What say you?

What’s the Best Use of Mobiles in Media Production for Ministries?

There is a lot of chatter these days about the capabilities of mobile devices (phones and tablets) for media production. Journalists for newspapers and local TV stations are now trained to create, file and share their stories all from their mobile phone. Filmmakers as influential as Stephen Soderberg are even embracing mobile devices for big-screen Hollywood projects. What should ministries being encouraging their members to do with the media creation potential they hold in their hand?

I want to encourage people to launch out and start creating and sharing media with their mobiles and I think there is a best use for mobiles in media production. That is the creation of timely, ā€œgood enoughā€ content, that places an emphasis on true engagement with an audience.

I’m not saying that a mobile, like a recent iPhone or Android phone can’t do almost everything a filmmaker could want to do. I’m saying that, for most media content creators, there are a few key areas where mobiles make the most sense.

Filming with Pixel 2 in Thailand
Going mobile in Thailand with a Pixel 2, Rode mic, Movo mount, and Manfrotto tripod.

Let me set up a context for what I’m saying. First, my ministry focus is the use of visual story media, shared mostly via social media channels, for the specific purpose of engaging audiences in spiritual conversations – not typically for entertainment or advertising.

Second, one of my roles is teaching ministries how to create compelling content using whatever resources they have at hand. That generally means mobile devices, inexpensive DSLR cameras or camcorders.

I recently spent a week in Asia with a group of students from about a dozen countries. Some were very experienced in media production, and some were novices. We were teaching a mobile-only approach to content creation. That is, the videos and other visual content we made were shot, edited, and distributed using only a mobile device. The following suggestions come from our experience and pushing to see if there are some practical “limits” on what we should be trying to achieve in a mobile-only approach.

Here are some suggestions:

  • Don’t get bogged down with highly planned, complex content. Use a mobile-only approach for creative, immediate, relevant, authentic content. Look at many influencers on places like YouTube. They aren’t creating really deep and complex content, but often focus on generating lots of content quickly, with compelling creative ideas. Most don’t create really complicated mini film projects for every post.
  • Emphasize immediacy and authenticity. Shoot current and cultural events with still and video clips, create very brief vlog-style testimonials and stories, then post your content quickly. Listen to conversations people are having, off and on-line, and join in the conversation with your own content, without delay. Authenticity is a real value held by most people – even if they follow pop stars. Pop stars will carefully curate a portion of their social media, but they also mix in more impromptu content as a way to make themselves seem more approachable, like you’re their new best friend out of 6 million followers!
  • If you have media professionals on your team, try to avoid paralysis by perfectionism! How can my God-given care for quality be a problem? When it effectively paralyzes me or delays the distribution of content because I want to “do it right.” In this case, doing it right may be exactly the wrong thing. Discipline yourselves to create quick-turnaround content that will encourage on-going engagement with your audience while you work on deeper, more complex content. Get it done and out into the conversation.
  • Overall, as you plan a content strategy, it’s wise to include a mix of immediate, less complex content, with some pieces that are more complex and deeper. We want to present competence and trustworthiness, but also approachability. As we think of our engagement strategies, let’sĀ look ahead and develop some content that is well-planned and deeper, but also plan for the more frequent creation of spontaneous content that gives that balance.
Beastgrip Rig
Tricking out an iPhone with a Beastgrip mount, Rode shotgun mic, lens adaptor, and Tamron 24-70mm lens.

Ultimately, who am I to argue with Stephen Soderberg? Of course there is a place to take advantage of a small, inexpensive, good quality device for some larger projects, even narrative feature films. So go ahead and pull out your mobile device (with $2000 worth of accessories!) to serve as a camera on a larger project, especially if mobility and low-profile is a need. But for that complex project, it’s advisable to pass on the rest of the production and post-production work to other devices, like laptops and desktop computers. They just have the power and sophisticated tools to make it more effective.

HOWEVER, by all means we should be using our amazing cameras and apps to create immediate, creative, relevant, authentic content.

Professional Video Apps for Android Devices – Do they exist?!

(Updated 17 February 2018)

I’m happy to say that, after a long time of lagging behind the iOS world, Android devices and apps are finally available to enable professional production on this platform.

And, because most people in the world are using an Android device, it makes sense to think about recommendations to help them, especially non-professional media creators, to choose the best tools for their video content.

For serious video content production, you may want to consider a video-specific app. While almost every general camera app allows you to choose still image capture or video capture (maybe even animated GIF and other formats) there are a few dedicated apps that only shoot video. I highly recommend checking these out, even if they add an app to your collection (who can resist just one more app?!)

Why would you choose a video-only app?

One reason is because a good dedicated video app will have controls that are designed for video shooting and you won’t get settings mixed up when switching between modes on a normal camera app. For instance, this can happen when switching between 4:3 aspect ratio high-definition still images and shooting HD video, which is typically 16:9 aspect ratio on your screen. Some apps choke a bit when switching. And, some apps are set to automatically start video recording when you switch to video mode. I can’t figure out why that’s a default feature (sometimes non-defeatable) but it’s a pain when you’re trying to shoot dedicated video. Ultimately, dedicated apps are designed for video shooting, and make the most of their interface and features.

As with still image capture apps, the image quality from these is essentially the same, if you shoot with the same settings (resolution, data rate, picture profile, etc.) The device hardware is really the defining and limiting factor. [BIG NOTE for low-end phone users; some of these apps are not recommended for you. Filmic Pro won’t even install on my Samsung Galaxy J5 (Marshmallow OS). My best advice if you have a low-end device is to go with a standard camera app, like Open Camera, that lets you shoot stills and video. No need for a specialized app.]

Here are three dedicated video capture apps that are the top of charts for me. I’ll review them in my general order of preference, but they’re all very good. Any weaknesses are generally pretty minor.


Filmic Pro ($15 USD)(plus in-app purchases for some specialized features)

Among mobile filmmakers and mobile journalists, Filmic Pro has long been the go-to app. It started life as an iOS-only app but the Android version is fully developed and gives you a full feature set for truly professional video production on a mobile device.


Filmic Pro gives you:

  • Full range of manual controls with a very friendly on-screen interface for manual focus and exposure control. Manual controls on all apps will be device dependent. They should work on most higher-end phones. On a lower-end phone, you still have manual control, but some features, like the sliders you see in the above screen capture, won’t be there.
  • Shooting aspect ratios for every popular format, including square format video, and UI rotation for simple vertical video shooting.
  • High resolution (including 4K) and data rates, depending on your device capabilities. Excellent video quality, including smooth motion.
  • Accurate frame rate. Other apps’ frame rates can vary widely, even if set in the app.
  • Format presets if you want to switch quickly between settings. For instance, a 4K setting and a FullHD (1080) video setting without going through many menus.
  • Automatic exposure and focus “pulling” for more professional control.
  • A continuous auto-focus mode that uses most of the screen as a focus area. This is great for gimbal and other handheld shots where you have a lot of motion in the scene.
  • App upgrades available for even more professional features such as picture profiles and LUTs. (Not really needed by mere mortal visual storytellers.)
  • Picture profile settings – these are advanced settings that professional filmmakers use to give them more control in editing their picture. Typically not something non-professionals want to use, as the video captured may not actually look very good until it is “graded” in an editing program.
  • Live audio monitoring, with on-screen meter, is possible with the proper adapters.

Weaknesses:

  • Lots of options that may be confusing to non-professionals.
  • Display can be cluttered if you have lots of features activated, but they are instantly accessible.

Cinema FV-5 Pro (paid version $4.50 USD)

Cinema FV-5 is a companion to Camera FV-5, which I’ve reviewed elsewhere. But it can also be purchased and used separately as a dedicated video capture app. As with Camera FV-5, the Cinema version is full-featured and well-suited to professional mobile production. If you want a dedicated app, I feel it’s the best choice for lower-end devices, even if features are disabled.

Things I especially like include:

  • Simple controls when first opened
  • Nice implementation of manual controls including a slider for focus and exposure on devices that have the Camera2 API.
  • Paid version (Pro) has full resolution and high data rate capabilities, up to your device’s specs.
  • The most common manual control I like to tweak, exposure compensation, is on screen all the time. Nice.
  • On-screen display of current settings.
  • Continuous focus mode is very accurate and useful.
  • Audio monitoring and on-screen meters
  • Professional features like interface customization, a histogram for video levels, etc.
  • Quick switching between features such as a histogram, stabilization on/off, etc.

Weaknesses:

  • No vertical video mode (interface rotation) – see my comments on other apps for my thoughts on why this is useful.
  • Locking and unlocking some functions, like manual exposure, could be simpler – a few too many clicks to release and re-set.

On a low-end device like my Galaxy J5 I found:

  • Some functions don’t seem to work consistently, like manual exposure by touch/hold on the screen. No change anywhere you put the “box.”
  • Of course, the manual controls change to meet the device specs. The capabilities are still there, just some controls get more basic.
  • Other device-dependent features, like 4K video recording, may be missing on low-end devices.

Cinema 4K (paid version $4.50 USD)

Cinema 4K is designed with many professional features for high-end devices. As the name implies, it can shoot up to 4K if your device can handle it. It is set up for more experienced shooters, but I find the controls are very intuitive and responsive.

I’m reviewing this app with a caveat. On my Google Pixel 2 (still pretty state-of-the-art as I write this) I get great general image quality. However, I see a lot of motion artifacts anytime I pan, tilt, or have a lot of motion in the shot. I’ve tried to track it down, and have decided it’s the app. My A/B testing with Filmic Pro on the same device shows ā€˜jerky’ motion in footage from Cinema 4K versus Filmic Pro footage, with the exact same settings. I’m willing to consider that it could be unique to the Pixel 2, so until I can do more tests with other phones, I’ll just leave it at that.

Cinema 4K gives you:

  • A very nice on-screen interface with common controls and settings clearly accessible.
  • Extensive, but easy-to-use manual controls, device dependent.
  • Very friendly settings menu that covers almost everything on one screen rather than many menus
  • Full range of resolutions and data rates for video files, device dependent.
  • Full screen, clean display when recording, but manual controls appear when you tap the screen. Nice implementation.
  • Picture profile settings – these are advanced settings that professional filmmakers use to give them more control in editing their picture. Typically not something non-professionals want to use, as the video captured may not actually look very good until it is “graded” in an editing program.

Weaknesses:

  • My biggest concern is actually image quality. Images without a lot of motion are great. I see a lot of motion artifacts in Cinema 4K footage when the camera is panning across a scene. I’ve done a lot of A/B testing and can’t fix it. I believe it is related to variable frame/bit rates used by most apps in mobile devices.
  • No vertical video adaptation. This has been a “rule” in the professional filmmaking world, but it’s passĆ©, to me. Let us shoot 4K vertical video!
  • No live audio monitoring, or on screen audio meters.
  • Cinema 4K will install on a lower-end phone, but many features are disabled. I don’t recommend it for low-end devices (see my note above.)


iPad Teleprompter – partial DIY

Rig up an inexpensive teleprompter using your iPad and a few items around the house.

I work alone sometimes and, sometimes, I have a need to shoot an on-camera piece with myself that can’t be just an impromptu web-cam piece. I want to address the camera directly and I want it to be scripted, therefore, a teleprompter would be nice. (Saves my aging brain from the stress of memorizing a 3 min. presentation and keeps my eyes from wandering to cue cards.) Well, this week I have just such a need. But I don’t own a teleprompter.

Here’s what I did, using a few pieces of ‘real’ gear and some things I scrounged from around my house. It’s a basic, but very functional teleprompter that takes advantage of my iPad and the ProPrompter app.

Rear View
Side View

I built a minimal rail set-up using a few pieces of my GiniRigs rails, with the addition of an extension bar that I use to hold up the picture frame.

I found an old picture frame, diploma-size, and pulled out the picture, leaving just the glass in the frame. Be careful, it won’t be safety glass and it’s very fragile!

I placed my iPad on the rails and, with a little piece of gaffer’s tape, made a hinge for the frame on the camera-side edge. Then I just moved my arm piece to give the proper 45 degree angle on the picture frame.

The ProPrompter software lets you flip and reverse the image as needed to get the proper orientation in the reflection.

When using a minimal rig like this, you will likely run into problems with reflections and glare. I would likely build a little tent or place something dark behind the camera and above the prompter to kill the glare. There is plenty of brightness on the screen, but you will want to make the iPad brightness up full.

Front Angle

I happen to be shooting with my iPhone 4S for this piece (’cause it’s about mobile production) and so I have my phone mounted in a Phocus mount. The odd little cube on the top is a bubble level.

These are rough photos as I was testing it. If I have a chance I will post some better ones. But it works!

Update: I forgot to mention that, when you’re working alone and shooting with an iPhone, monitoring can be a problem. You can hardwire to a monitor if you have an i-device-to-VGA or HDMI cable and a portable monitor. Today I’m using my laptop as a monitor via AirServer software. The phone broadcasts (mirrors) to the laptop so I can set my framing and such. There is lag but it helps a lot if you’re flying solo.

Article: Getting Started With iPad Editing Apps

Total Mobile Filmmaking! If you’ve ever dreamed of traveling the world (or your neighborhood) while making movies with just a phone or tablet, you may just be in luck.

Total Mobile Filmmaking! If you’ve ever dreamed of traveling the world (or your neighborhood) while making movies with just a phone or tablet, you may just be in luck.

Here’s my brief review of several video editing apps for iPad/iPhone.